The unfortunate thing about records, especially older ones, is that sometimes they're wrong. Even census records aren't correct 100% of the time (or consistent from census-to-census). So, when I went looking for my great-great grandfather's grave in Collegeville, I came up empty-handed using records that I thought were accurate.
But, as if he was leading me to him, I accidentally drove to Norristown while looking for a supermarket in King of Prussia one day (while at CKC-Valley Forge). When I got home, I started digging and found information that lead me to believe he was buried there...less than a mile from where I had been. Arrgghhh!!!
Fast forward to my second trip to Philly in less than a month.
With the boys napping in the car, and time to kill before the Wiggles concert, we drove up to Norristown to check it out. The cemetery is huge and the main office had yet to return my inquiry, so I was crossing my fingers that I would find him (and anyone else that was related). As we drove through the cemetery, I gave my husband strict instructions on what names to look for, oh and we were finding them,...all but the one I was really looking for. To quote me, "He's so close I can taste it," and as if he heard me from above, I look up to see a huge family marker. "Yes, Yes, Yes!!!" I tried to contain my excitement as the boys were still sleeping. I scrambled to find a place to park and grab my camera and hoped that my great-great grandparents were there...and they were, along with my great-great aunt and uncle. Relief set in as I was able to verify another fact in the family story.
Saturday, August 19, 2006


Tuesday, August 15, 2006
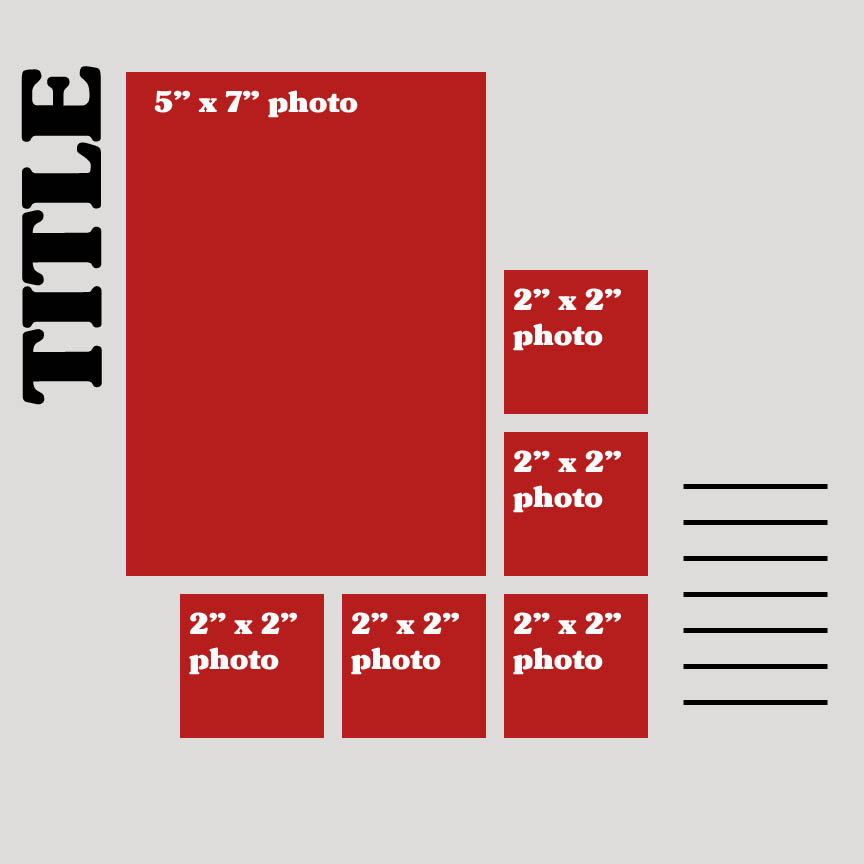
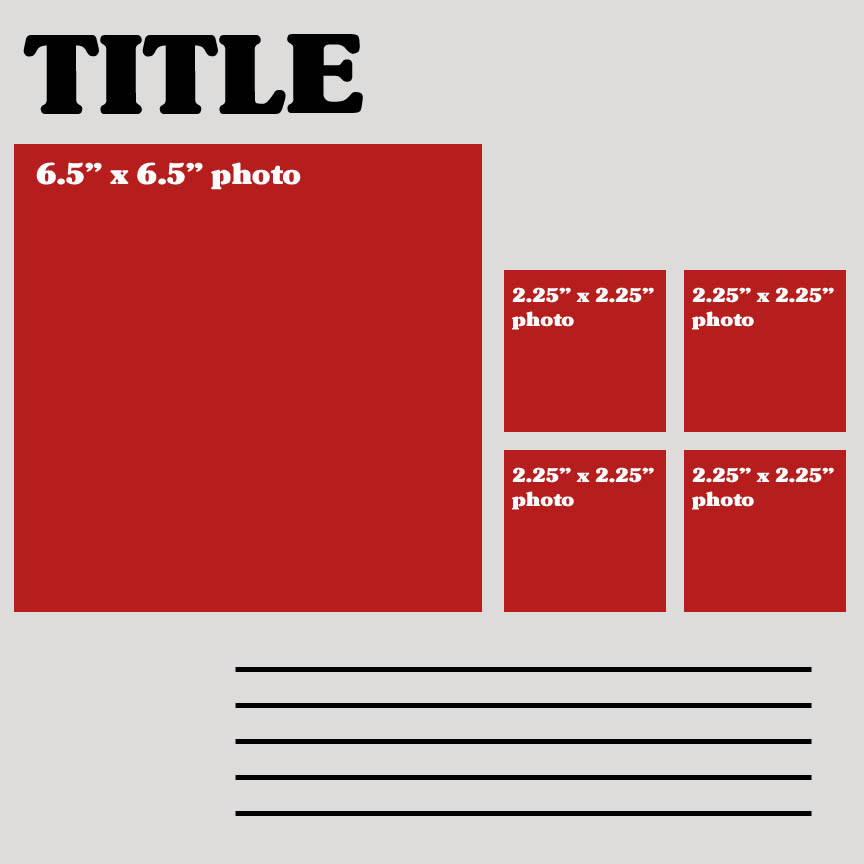
Scrapbook Sketches: Opposites Attract
Just doing some sketching and thought I'd share... These two sketches are for a single, 12x12 layout and feature one large photo and several small complimentary photos. Enjoy!


Friday, August 11, 2006
On Being a Perfectionist
It stands to reason that scrapbooking and an overwhelming need to have everything be "just so," just don't mix... Yet, here I am, it's 10:00 at night and I'm coming to grips with an ever so slight laminating glitch on something that in a day's time my two-year old boys will not even notice. They're going to be squealing with joy because they have a portable picture book of their favorite "Things That Go" - the trash trucks and motorcycles that we look for every day on the way to school.
Scrapbooking isn't about being right, perfect or precise, it's about the person that benefits from it being perfectly happy that you made them something.
Scrapbooking isn't about being right, perfect or precise, it's about the person that benefits from it being perfectly happy that you made them something.
Friday, August 04, 2006
Staying in Fashion with Pantone Color Reports
Looking to spice up your scrapbook layouts with some of the hottest colors of the season. Check out Pantone's Fall 2006 Color Report.
Thursday, August 03, 2006
Text Circles in MS Word
Looking to make a text circle for a CD cover or to put a cool twist on your scrapbook journaling, but don't have scrapbook software? Not a problem - text circles can be easily created in MS Word using the Word Art function. Just use the following steps:That will bring up the Word Art Gallery dialog box. You want to select the third option from the left in the very first row. It doesn't have a specific name, but it looks like bowed text. Click OK.
Your text will not automatically appear in the shape of a circle, but it's easy to do. You will notice white guide boxes that surround the text that would form a triangle if you "connected the dots".
Your text will look like a flattened circle at first, but your white guide boxes will help to fix that. You should see two in the middle of your text image.
Happy Journaling!
Monday, July 31, 2006
CKC - Valley Forge Review (Friday)
One of the benefits of taking so many classes was that you get free entry into the vendor faire and early entry into the vendor faire on Friday morning. So…since my first class on Friday wasn't until 11:00, I was going to take full advantage of the early entry to get some shopping done.
As I drove up to the Convention Center at 10 minutes to 9:00, I saw a mass of women standing outside the building. "Oh no," I thought, "…It's going to be a mad house in there", but honestly, was I expecting anything less? Not really. So, I took the bare essentials, headed towards the doors and who do I see, but Lisa Bearnson (founding editor of CK) signing autographs. I snap a few initial pictures – you didn't really think I'd go without a camera did you... and find the end of the line. No sooner had I done that did I hear that the power was out in the convention center and they had no idea when it would be back on (hence, Lisa was outside signing autographs, which was very nice of her).
Resigned to our "fate", some of us stood in line waiting to meet Lisa, others chatted with their friends and others burned over-priced gasoline sitting in their air conditioned cars. I don't know how long it really took for me to actually meet Lisa, but I'm pretty sure it was at least 45 minutes…and still no power.
So, we continue to "hang out" in the ever-increasing heat and humidity….waiting. I chatted with several different ladies and just took everything in. For so many women being kept from scrapping and/or shopping, not a one was cranky, feisty or in a bad mood. It might have been the free ice cream sandwiches that the folks from Skinny Cow were handing out. Who can turn down free ice cream at 10:00 AM?!
Another hour passed and they finally let us in. We were all admittedly drained from the heat and giving each other a pass on not being as "flowery" as we would normally be. Given that it was already 11:00, I was headed straight to class as opposed to the vendor faire, but after I got into class, I was so glad to be there, as this was a really cool one.
It's All About You Ruler Book (5 out of 5)… Our instructor was Debbie Hill – lead designer for Junkitz – and she was just plain cool. She had us laughing from the get-go, insisted that we get excited if we won a door prize and took us step-by-step through a GREAT project. It helped that we had two hours to complete it, but my thoughts are that each class should be at least an hour-and-a-half.
In Living Color (5 out of 5)… They warned us that the Bazzill + BasicGrey class was fast-paced, but it was nothing compared to this one. Despite the circumstances, you couldn't help but feel for our instructor… She had just come back from CHA, so she had probably been home for all of two minutes – just enough time to switch the clothes in her suitcase. It took her 22 hours to get from CA to PA and when she arrived the power in the hotel was out, so she had to sleep on a sofa in the lobby. And… to top things off, her new boss provided her with the ideas/supplies for kits, but hadn't bothered to put the kits together. So, her assistants were building them on the fly. The great thing was it somehow worked. As crazy as things seemed, we made six layouts in a little over an hour and all I have to say it keep your eyes out for the new Scrapworks paper because it is BEAUTIFUL!
Accordion Mantle Book (5 out of 5)… When I walked into class, I was exhausted from the day's events, but encouraged to see Debbie from my other Junkitz class was our instructor. Secretly, I was doing jumping jacks as I loved her class from earlier in the day. In this instance, she had asked for some help, so several of us volunteered to get things set-up, which, if asked, I recommend doing because as I quickly determined you get free supplies as "payment".
Despite the crazy start, Friday was by far the best day out of the three and I had to laugh at my appearance by the end of the day. I had somehow managed to get ink all over myself – it was even on my arms – so I resembled the name of the ink we had been using all day – black soot. No worries though, because I had two altered books and six layouts to show for it!
As I drove up to the Convention Center at 10 minutes to 9:00, I saw a mass of women standing outside the building. "Oh no," I thought, "…It's going to be a mad house in there", but honestly, was I expecting anything less? Not really. So, I took the bare essentials, headed towards the doors and who do I see, but Lisa Bearnson (founding editor of CK) signing autographs. I snap a few initial pictures – you didn't really think I'd go without a camera did you... and find the end of the line. No sooner had I done that did I hear that the power was out in the convention center and they had no idea when it would be back on (hence, Lisa was outside signing autographs, which was very nice of her).
Resigned to our "fate", some of us stood in line waiting to meet Lisa, others chatted with their friends and others burned over-priced gasoline sitting in their air conditioned cars. I don't know how long it really took for me to actually meet Lisa, but I'm pretty sure it was at least 45 minutes…and still no power.
So, we continue to "hang out" in the ever-increasing heat and humidity….waiting. I chatted with several different ladies and just took everything in. For so many women being kept from scrapping and/or shopping, not a one was cranky, feisty or in a bad mood. It might have been the free ice cream sandwiches that the folks from Skinny Cow were handing out. Who can turn down free ice cream at 10:00 AM?!
Another hour passed and they finally let us in. We were all admittedly drained from the heat and giving each other a pass on not being as "flowery" as we would normally be. Given that it was already 11:00, I was headed straight to class as opposed to the vendor faire, but after I got into class, I was so glad to be there, as this was a really cool one.
It's All About You Ruler Book (5 out of 5)… Our instructor was Debbie Hill – lead designer for Junkitz – and she was just plain cool. She had us laughing from the get-go, insisted that we get excited if we won a door prize and took us step-by-step through a GREAT project. It helped that we had two hours to complete it, but my thoughts are that each class should be at least an hour-and-a-half.
In Living Color (5 out of 5)… They warned us that the Bazzill + BasicGrey class was fast-paced, but it was nothing compared to this one. Despite the circumstances, you couldn't help but feel for our instructor… She had just come back from CHA, so she had probably been home for all of two minutes – just enough time to switch the clothes in her suitcase. It took her 22 hours to get from CA to PA and when she arrived the power in the hotel was out, so she had to sleep on a sofa in the lobby. And… to top things off, her new boss provided her with the ideas/supplies for kits, but hadn't bothered to put the kits together. So, her assistants were building them on the fly. The great thing was it somehow worked. As crazy as things seemed, we made six layouts in a little over an hour and all I have to say it keep your eyes out for the new Scrapworks paper because it is BEAUTIFUL!
Accordion Mantle Book (5 out of 5)… When I walked into class, I was exhausted from the day's events, but encouraged to see Debbie from my other Junkitz class was our instructor. Secretly, I was doing jumping jacks as I loved her class from earlier in the day. In this instance, she had asked for some help, so several of us volunteered to get things set-up, which, if asked, I recommend doing because as I quickly determined you get free supplies as "payment".
Despite the crazy start, Friday was by far the best day out of the three and I had to laugh at my appearance by the end of the day. I had somehow managed to get ink all over myself – it was even on my arms – so I resembled the name of the ink we had been using all day – black soot. No worries though, because I had two altered books and six layouts to show for it!
CKC – Valley Forge Review (Thursday)
Having never been to one of these types of events before, I loaded up on classes to get maximum impact and took a total of nine over the three days. I was/am still exhausted from the whole experience, but had a good time, got to create beautiful layouts and mini-books, but more importantly, it forced me to make the trip to Collegeville, PA to visit a town rich in my family's history. I had many questions answered, some still remain and some new ones to research, but that's the beauty of genealogy. Just when you get think you've got it all figured out…a new twist gets added to the fold.
I arrived in Pennsylvania late Wednesday night, so I wouldn't have to rush Thursday morning to make my 10:00 appointment at Ursinus College. And so we begin…
Thursday was almost a blur thanks to the oppressive heat and humidity and the Pennsylvania roads. I will preface what I'm about to say with the fact that I normally don't get lost, in fact, I consider myself quite the "navigator", but someone must have slipped Jack Sparrow's crazy compass into my car, or into Google Maps…, because I ended up everywhere but where I needed to go. I'd turn one way only to find a dead end. I'd think I was back on the right track only to find that the street I thought I could use was one way – in the wrong direction. Let's just say it got to the point where I broke down and made a $12.95 investment in a Metro Philly map, and yet… that didn't even seem to help, so I guess I'll chalk it up to good old O.E. (Operator Error).
I did make it to Ursinus, but with just enough time to walk across campus to the library, where I was to meet with the school historian to go over some of my ancestor's records. The experience was amazing. To quote Jack Nicholson, reading about my great-great grandfather, "…makes me want to be a better man", or in my case, woman. He had an amazing, though short, life and made such a contribution to his community. It made me think seriously about what I could do to "make a difference", if even just to one person, so we'll see where that takes me, but for now I'll concentrate on my two little buddies. Despite all the information I was able to gather from the school records, a few inconsistencies remain, so my search continues.
By the time I had finished in Collegeville, I had a little extra time, so I headed towards Valley Forge, hoping that the hotel would let me check in early – they did. I only had two classes on Thursday evening….CK's Block Party and Monogram Madness.
CK's Block Party (3 out of 5)… I can only describe the instructor for this class as the Energizer Bunny on a sugar high. I don't know if she was nervous, or just wasn't a good instructor, but she was talking so fast and taking breaths so infrequently, that I felt out of breath by the time our class was over.
Out of all the classes, this was the most design based and focused on how you can use squares and rectangles in your layouts to create movements and symmetry. The layout was pretty cool, but we got so wrapped around the proverbial axle (at all the wrong points) that we never got very far, though we did have the instructions, so I am in the process of finishing it up.
Tips from class - You can use the index prints from your developed film as additional space fillers/embellishments on your layouts. Also, you can stamp an image on a square piece of paper, cut it into four pieces and then used glossy accents over top of each piece to make them look like tiles – very cool effect.
Monogram Madness (2 out of 5)… This class was slightly misleading. I figured we'd be making one of those super-cool chipboard monograms that are embellished to the hilt, but alas, this class focused on stamps and we spent the first 10-15 minutes cutting out stamped images. The layout that we made was OK, but I found the most beneficial information came in the form of some cool tips that our instructor shared with us. For those of you that stamp a lot, this was probably obvious to you, but to a "non-stampers" they were some pretty neat tricks.
For example, to add a pattern to stamp, you do the following:
Ink up your primary stamp (like a letter stamp). Ink up a portion of a patterned stamp (like a script block) in a different colored ink. Then, apply the patterned stamp to the primary stamp. Finally, stamp your image.
You can "kick this up a notch" and add a border around your image by taking a dark marker and coloring the edges of the stamp (kind of like you would do to a piece of paper and an ink pad).
Who knew stamps could be so versatile?!
Friday started with a bang…literally – courtesy of Mother Nature. A line of violent storms came charging through Valley Forge during the VERY early morning hours on Friday. It woke me up and, as I would find out later than morning, knocked out power to the convention center and adjoining hotels. Let's just say we were all a little worn out by the time the day actually started.
More to follow…
I arrived in Pennsylvania late Wednesday night, so I wouldn't have to rush Thursday morning to make my 10:00 appointment at Ursinus College. And so we begin…
Thursday was almost a blur thanks to the oppressive heat and humidity and the Pennsylvania roads. I will preface what I'm about to say with the fact that I normally don't get lost, in fact, I consider myself quite the "navigator", but someone must have slipped Jack Sparrow's crazy compass into my car, or into Google Maps…, because I ended up everywhere but where I needed to go. I'd turn one way only to find a dead end. I'd think I was back on the right track only to find that the street I thought I could use was one way – in the wrong direction. Let's just say it got to the point where I broke down and made a $12.95 investment in a Metro Philly map, and yet… that didn't even seem to help, so I guess I'll chalk it up to good old O.E. (Operator Error).
I did make it to Ursinus, but with just enough time to walk across campus to the library, where I was to meet with the school historian to go over some of my ancestor's records. The experience was amazing. To quote Jack Nicholson, reading about my great-great grandfather, "…makes me want to be a better man", or in my case, woman. He had an amazing, though short, life and made such a contribution to his community. It made me think seriously about what I could do to "make a difference", if even just to one person, so we'll see where that takes me, but for now I'll concentrate on my two little buddies. Despite all the information I was able to gather from the school records, a few inconsistencies remain, so my search continues.
By the time I had finished in Collegeville, I had a little extra time, so I headed towards Valley Forge, hoping that the hotel would let me check in early – they did. I only had two classes on Thursday evening….CK's Block Party and Monogram Madness.
CK's Block Party (3 out of 5)… I can only describe the instructor for this class as the Energizer Bunny on a sugar high. I don't know if she was nervous, or just wasn't a good instructor, but she was talking so fast and taking breaths so infrequently, that I felt out of breath by the time our class was over.
Out of all the classes, this was the most design based and focused on how you can use squares and rectangles in your layouts to create movements and symmetry. The layout was pretty cool, but we got so wrapped around the proverbial axle (at all the wrong points) that we never got very far, though we did have the instructions, so I am in the process of finishing it up.
Tips from class - You can use the index prints from your developed film as additional space fillers/embellishments on your layouts. Also, you can stamp an image on a square piece of paper, cut it into four pieces and then used glossy accents over top of each piece to make them look like tiles – very cool effect.
Monogram Madness (2 out of 5)… This class was slightly misleading. I figured we'd be making one of those super-cool chipboard monograms that are embellished to the hilt, but alas, this class focused on stamps and we spent the first 10-15 minutes cutting out stamped images. The layout that we made was OK, but I found the most beneficial information came in the form of some cool tips that our instructor shared with us. For those of you that stamp a lot, this was probably obvious to you, but to a "non-stampers" they were some pretty neat tricks.
For example, to add a pattern to stamp, you do the following:
You can "kick this up a notch" and add a border around your image by taking a dark marker and coloring the edges of the stamp (kind of like you would do to a piece of paper and an ink pad).
Who knew stamps could be so versatile?!
Friday started with a bang…literally – courtesy of Mother Nature. A line of violent storms came charging through Valley Forge during the VERY early morning hours on Friday. It woke me up and, as I would find out later than morning, knocked out power to the convention center and adjoining hotels. Let's just say we were all a little worn out by the time the day actually started.
More to follow…
Wednesday, July 26, 2006
A Trip Back in Time
Tonight I'm off.... Off to "touch and feel" some of the results of my genealogical research and to enjoy a weekend away at a scrapbook convention.
My Destination: SE Pennsylvania (more specifically...Collegeville and Valley Forge)
The former to visit Ursinus College and have some fun digging in the archives to learn some more tidbits about my ancestors. The latter to go to the Creating Keepsakes Conventions - three days, nine classes and more scrapbook supplies than any woman should be allowed near with a credit card. :-)
I haven't finished packing, but that's OK...that's normal. I've packed for a week long trip to Germany in less than an hour before, so I should be fine, as long as I don't forget my glue dots!!
More to follow....
My Destination: SE Pennsylvania (more specifically...Collegeville and Valley Forge)
The former to visit Ursinus College and have some fun digging in the archives to learn some more tidbits about my ancestors. The latter to go to the Creating Keepsakes Conventions - three days, nine classes and more scrapbook supplies than any woman should be allowed near with a credit card. :-)
I haven't finished packing, but that's OK...that's normal. I've packed for a week long trip to Germany in less than an hour before, so I should be fine, as long as I don't forget my glue dots!!
More to follow....
Sunday, July 23, 2006
Wedding Anniversary Journaling Checklist
Whether it's your first, fifth or fiftieth wedding anniversary, you can get so caught up with the day-to-day activities that you don't realize how much actually changes in your lives.
So, why not make a "Then and Now" scrapbook layout and use the following questions to spark your journaling (and see just how much has transpired, since you both said, "I do"):
What jobs did you have then and what jobs do you have now? You may still be with the same company, but has your position title changed?
How has your family "structure" changed? What pets (if any) did you have when you got married? What (if any) do you have now? Do you have children, grandchildren, great-grandchildren?
Where did you live then? Where do you live now (and how many moves were there in between)?
Take a trip through the history books and compare the events of the past to current world events. For example someone married during the height of the Cold War would have been hard pressed to go along with the idea that "The Wall" would ever come down and yet…here we are.
NOTE: Don't limit your trip through time to political events, but look at businesses that were around when you were married or your hometown sports teams. When the Senators left Washington, D.C., no one thought baseball would ever return, but again…here we are.
What were your favorites (music, movies, food, etc.) then and what are your favorites now?
Happy Scrapping!!
So, why not make a "Then and Now" scrapbook layout and use the following questions to spark your journaling (and see just how much has transpired, since you both said, "I do"):
NOTE: Don't limit your trip through time to political events, but look at businesses that were around when you were married or your hometown sports teams. When the Senators left Washington, D.C., no one thought baseball would ever return, but again…here we are.
Happy Scrapping!!
Friday, July 14, 2006
Starter Tips for Photoshop Elements
You've been saving up for a copy of Photoshop Elements (PSE), so you can dabble in a little digital scrapbooking, but you open it up and have no clue where to begin. You're probably wondering... What is a layer? What is a filter? And how do I do something as simple as changing a photo to black and white?
As the process of learning PSE can be daunting, we thought we'd share a few tips with you to get you going.
To resize an image, you can use Alt+Ctrl+I or go to the Image Menu, select Resize and then Image Size. The same dialog box will appear with either option, it just depends on whether you like to use Shortcut keys or not. You then have the choice of resizing your image by percent, inches, centimeters, etc.
To change your photo to black and white, go to the Enhance menu, select Adjust Color and then Adjust Hue/Saturation (or Ctrl+U). You then want to pull the Saturation setting all the way to the left (so it equals -100).
To create a sepia-toned photo, you open the Adjust Hue/Saturation dialog box (Ctrl+U) and click on the colorize checkbox. Then, drag the hue slider from left to right until you find the color you like. For a brown tone, the hue value should be around 40. To create a deeper or lighter tone, just adjust the saturation slider until you get the effect you like.
NOTE: These effects will change the actual pixels of the image. If you just want to create a layer, that will leave the original image intact, you can create an adjustment layer that will create the same effect (Layer Menu --> New Adjustment Layer or click on the half-black/half-white circle in your layer window and select Adjust Hue/Saturation).
Happy (Digital) Scrapping!!
As the process of learning PSE can be daunting, we thought we'd share a few tips with you to get you going.
To resize an image, you can use Alt+Ctrl+I or go to the Image Menu, select Resize and then Image Size. The same dialog box will appear with either option, it just depends on whether you like to use Shortcut keys or not. You then have the choice of resizing your image by percent, inches, centimeters, etc.
To change your photo to black and white, go to the Enhance menu, select Adjust Color and then Adjust Hue/Saturation (or Ctrl+U). You then want to pull the Saturation setting all the way to the left (so it equals -100).
To create a sepia-toned photo, you open the Adjust Hue/Saturation dialog box (Ctrl+U) and click on the colorize checkbox. Then, drag the hue slider from left to right until you find the color you like. For a brown tone, the hue value should be around 40. To create a deeper or lighter tone, just adjust the saturation slider until you get the effect you like.
NOTE: These effects will change the actual pixels of the image. If you just want to create a layer, that will leave the original image intact, you can create an adjustment layer that will create the same effect (Layer Menu --> New Adjustment Layer or click on the half-black/half-white circle in your layer window and select Adjust Hue/Saturation).
Happy (Digital) Scrapping!!
Come Join Us at Flickr!
We have set up a layout gallery on Flickr and we'd love for you to stop by for a visit!!
Wednesday, July 12, 2006
The Main (Scrapbooking) Event
Creating Keepsakes has just unveiled a centralized website for all of their events - conventions, cruises...you name it, it's there. They will even be providing online eduction opportunities starting this August.
Happy Scrapping!!
Happy Scrapping!!
Monday, July 10, 2006
There's Nothing Basic about Bazzill Basics Cardstock!!
Do you love BasicGrey Patterned Paper?! Do you spend way too much time in your LSS finding cardstock that matches perfectly? Great news… Bazzill has done all the work for you and come up with a list of coordinating cardstock to BasicGrey's wonderfully wild paper.
Enjoy!
Blitzen: grenadine, ruby slipper, pear, dark olive, hillary, avalanche, powder blue, jet stream, waterfall, lakeshore
Color Me Silly: candy apple, red devil, butterfly, sunshine, bumble bee, limeaide, icy blue, true teal, mardi gras, brocade
Fusion: piglet, strawberry, gumbo, orange crush, burnt ember, cocoa butter, canteen, wild pansy, mardi gras, pansy
Hang 10: yam, lemonade, pickle, salsa verde, anchor, dock, dark denim, light house, buttercup, hershey
Lollipop Shoppe: chablis, red hot, maraschino, dandelion, green tea, pistachio, teal op, true teal, raindrop, lavender twilight
Lucky: rose, hot pink, watermelon, pomegranate, dandelion, macintosh, guacamole, starlight, pearberry, concord
Oh Baby-Boy: tropicana, squash, dark tangerine, apricot, limeaide, apple green, grass green, wave, sparrow, jacaranda
Oh Baby-Girl: pollen, squash, melon, apricot, light rosey, dark rosey, ruby red, bubble blue, katydid, heather
Phresh and Phunky: mauve ice, petunia, cucumber, fern, ivy, waterfall, jacaranda, stonewash, lighthouse
Skate Shoppe: cream puff, limeaide, sea breeze, pistachio, turquoise mist, icy blue, artesian pool, starlight, mocha divine, dark chocolate
Urban Couture: firehearts, watermelon, red hot, sunbeam, green tea, breathtaking, rain drop, iced cocoa, mocha divine
Vagabond: yukon gold, curry spice, honeycomb, buttercup, leapfrog, fern, dark taupe, windy, sapphire, nightmist
Enjoy!
For more information on selecting colors for your scrapbook layouts, check out our article on color!
Tuesday, July 04, 2006
Free Digital Scrapbook Download - Yellow Ribbon
 As we all prepare to celebrate America's birthday, we know there are more than a few family's out there with a son, daughter, husband or wife who is serving our Country in the name of freedom. For you, and anyone else that is working on a digital scrapbook layout for their Soldier, please feel free to download this yellow ribbon for use in your layouts.
 There is no charge to you and you can download as many times as you need to. Just right click on the picture, select "Save Picture As" and save it to your hard drive. The *.png file is only about 29 KB, but is saved at 300 ppi and the background is transparent (despite it's appearance here on the website).
We here at Choubox Scrapbook Design wish you and your family a very happy and safe Independence Day!
Friday, June 09, 2006
Father's Day Gift Idea
You've given him the obligatory tie... You've given him  a set of grilling tools... and now you're looking for something different, something more personal.
Why not try a "scrapbook" gift? It doesn't have to be complicated. In fact, it's very simple and can be done in less than an hour.
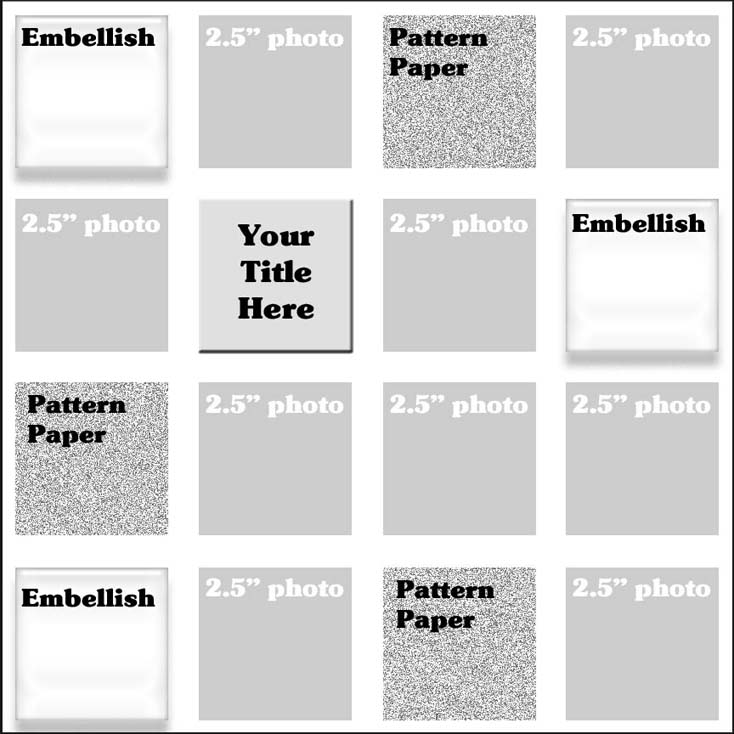
Take your favorite pictures of the kids from the past year and make your Dad, Father-In-Law, Husband or Grandfather a 12*12 "Year in the Life" scrapbook layout (see sketch for layout idea). Then, put it in a frame, so they can show off their beautiful family at the office!!
 a set of grilling tools... and now you're looking for something different, something more personal.
Why not try a "scrapbook" gift? It doesn't have to be complicated. In fact, it's very simple and can be done in less than an hour.
Take your favorite pictures of the kids from the past year and make your Dad, Father-In-Law, Husband or Grandfather a 12*12 "Year in the Life" scrapbook layout (see sketch for layout idea). Then, put it in a frame, so they can show off their beautiful family at the office!!
Monday, May 08, 2006
Big Bix Bargains
When we think of Wal-Mart and Target, we don't necessarily think of scrapbook supplies (like we would of our local craft store), but you'd be surprised at the bargains you can find!!
Target, for example, has an actual scrapbook section, but if you go a few aisles over to the card section, you will find some cute epoxy stickers...that always seem to be on clearance. You can also get paper clips in a variety of shapes and sizes in the school supplies aisle:
A 5-count pack of primary color, jumbo clips is $1.50,
A 48-count pack of tropical color, geometric shaped clips is $2.00, and
A 50-count pack of metallic, circle clips is $3.00.
The options are obviously limited, but whose not for saving a little money every now and then!
Wal-Mart, too, has a good selection of scrapbooking basics and some of the best prices we've seen. EK Success Adornaments Scrapbook Fibers are only $5.00 and Vario Tab Refills are less than $6.00 - both $1.00 plus less than what you'll find at most stores.
Happy Saving!!
Target, for example, has an actual scrapbook section, but if you go a few aisles over to the card section, you will find some cute epoxy stickers...that always seem to be on clearance. You can also get paper clips in a variety of shapes and sizes in the school supplies aisle:
The options are obviously limited, but whose not for saving a little money every now and then!
Wal-Mart, too, has a good selection of scrapbooking basics and some of the best prices we've seen. EK Success Adornaments Scrapbook Fibers are only $5.00 and Vario Tab Refills are less than $6.00 - both $1.00 plus less than what you'll find at most stores.
Happy Saving!!
Tuesday, May 02, 2006
Making Your Own Patterned Paper
Announcing Baby's Arrival
Looking for a unique way to add a baby's birth date to a scrapbook layout or handmade announcement?
Just go into Microsoft Word, or your word processor of choice, and type in baby's birth date in various font types and sizes (even do different date formats). Do about five lines to create some variety, copy and paste it several times to create a large block of text (your pattern) and then print it out onto cardstock that will match your layout. Then, all you have to do is cut it to fit the size of the scrapbook element (e.g., a 2" x 8" strip).
Toddler Art
If you have a toddler around the house that is just getting into crayons, have them create some patterned paper for you! Just sit them down with a sheet of white cardstock, some crayons and let them color away.
Take pictures of them while they're doing it and you've got the makings of an adorable layout!!
Looking for a unique way to add a baby's birth date to a scrapbook layout or handmade announcement?
Just go into Microsoft Word, or your word processor of choice, and type in baby's birth date in various font types and sizes (even do different date formats). Do about five lines to create some variety, copy and paste it several times to create a large block of text (your pattern) and then print it out onto cardstock that will match your layout. Then, all you have to do is cut it to fit the size of the scrapbook element (e.g., a 2" x 8" strip).
Toddler Art
If you have a toddler around the house that is just getting into crayons, have them create some patterned paper for you! Just sit them down with a sheet of white cardstock, some crayons and let them color away.
Take pictures of them while they're doing it and you've got the makings of an adorable layout!!
Saturday, April 01, 2006
Subscriptions for Soldiers
Are you looking for another way to support our troops? Send a Soldier a gift subscription to a magazine. Primedia, Inc., publisher of some of our favorite scrapbooking magazines (Creating Keepsakes, Simple Scrapbooks, Paper Crafts), has made 47 of its magazines available for free to any active-duty Soldier serving overseas.
For more information on the program, including how to make a donation, go to Subscriptions for Soldiers. For Soldiers interested in signing up for free subscriptions, send an e-mail to information@subscriptionsforsoldiers.com.
For more information on the program, including how to make a donation, go to Subscriptions for Soldiers. For Soldiers interested in signing up for free subscriptions, send an e-mail to information@subscriptionsforsoldiers.com.
Saturday, March 11, 2006
Grass Stains - Guaranteed
Do you have a little soccer player in your family or a little boy that loves to play outside? Feel like you're always trying to get grass stains out of their clothes? Well, take those unsightly stains and transfer them to your scrapbook pages. That's right...re-create grass stains on your scrapbook layouts using Tim Holtz's Distress Ink. Specifically, using the Peeled Paint shade, just drag the ink pad across your scrapbook element or journaling mat at a 45 degree angle (like you were sliding through the grass). It's a great shade of green - guranteed to create grass stains that will last for years to come!
Friday, March 03, 2006
A Little Scrap Can Go a Long Way...
In the 1800s, scrapbooks first got their name from the different "scraps" (tickets, clippings, etc.) that were contained within them. These days one could make a case for scrapbooks getting their name from the amount of "scrap" paper that gets generated in the process, and before you stick that next strip of scrap paper in the trash, think about it's possible uses...
Testing out new tools and techniques
Imagine... You just bought an embossing heat tool and are anxious to use it on a layout for your wedding scrapbook. Are you going to give it a test run on fancy paper that cost you $1.00/sheet? Of course not, that's what scrap paper is for! You can use those small pieces of excess cardstock to test out edging scissors, die cut machines, stamps, chalks, paints and inks.
Layout Templates
We are firm believers in the saying, "measure twice, cut once". Often used by carpenters, it can apply to just about any other craft, especially scrapbooking. You wouldn't cut into an expensive piece of paper, if you aren't quite sure exactly what size it needs to be. So, take some scrap paper and create your own layout template system. There's no need to spend $60, $80 or $100 dollars on a store bought version, when regular old cardstock will do the trick. Just cut out various shapes to represent the pictures and some basic scrapbook elements (paper strips, mats, etc.) and you're on your way.
Embellishments
Save those scraps of fancy patterned paper, and even good quality cardstock, to create your own embellishments. You can use small pieces of paper to cover a piece of chipboard, create a frame or die-cut shape or mat stickers for a title.
No matter how insignificant it might seem at the time, even the smallest pieces of paper could be used in another layout, especially if it's a basic color that you use on a regular basis.
Happy Scrapping!
Imagine... You just bought an embossing heat tool and are anxious to use it on a layout for your wedding scrapbook. Are you going to give it a test run on fancy paper that cost you $1.00/sheet? Of course not, that's what scrap paper is for! You can use those small pieces of excess cardstock to test out edging scissors, die cut machines, stamps, chalks, paints and inks.
We are firm believers in the saying, "measure twice, cut once". Often used by carpenters, it can apply to just about any other craft, especially scrapbooking. You wouldn't cut into an expensive piece of paper, if you aren't quite sure exactly what size it needs to be. So, take some scrap paper and create your own layout template system. There's no need to spend $60, $80 or $100 dollars on a store bought version, when regular old cardstock will do the trick. Just cut out various shapes to represent the pictures and some basic scrapbook elements (paper strips, mats, etc.) and you're on your way.
Save those scraps of fancy patterned paper, and even good quality cardstock, to create your own embellishments. You can use small pieces of paper to cover a piece of chipboard, create a frame or die-cut shape or mat stickers for a title.
No matter how insignificant it might seem at the time, even the smallest pieces of paper could be used in another layout, especially if it's a basic color that you use on a regular basis.
Happy Scrapping!
Subscribe to:
Posts (Atom)